Saturday, March 30, 2013

Fiber, Fur, and Fun

Today was Fiber Market Day in Prineville, a town about 40 miles from Bend. We have been looking forward to going since they advertised that is was for spinners, knitters, and FELTERS! yay!
Nothing like seeing the roving in person, feeling with your hands, seeing the true colors.
Plus the added bonus of having the fiber producing critters there! So off we went.
The town of Prineville from the overlook
smiling alpaca
rabbits, sheep, alpaca, llama

The Fiber Market
our purchases, waiting to become something cool!
We had a nice time at the market, and glad we went. Since we were in the area we decided to drive along a scenic byway to a hiking area. The Crooked River Canyon is a river walled in by towering layer-cake basalt cliffs. The hike takes you up a juniper and sage canyon, across a plateau to Chimney Rock.


That's where we are hiking up to!


From the top, The Sisters
Chimney Rock
We had a nice outing, exploring new towns, and seeing new things.
And the new roving is calling our name to make something! A cat cave is next I do believe!

Tuesday, March 19, 2013

I Can't "Resist Felting"

Ok, I'm sure by now you are a bit tired of hearing about felt....
But just one more post..ok?
I want to make a felted cat cave for TSK. He loves to burrow under the blankets and I think he would like the cave-like encapsulated qualities of a felted bed.
But first, I had to test the 'Resist Felting' process. It's a form of wet felting.
 A resist is used in felting to make three dimensional objects from a flat pattern. The resist can be anything flat that will keep the two sides of felt from felting together, i.e. it “resists” the felting process. I used some foam packing material that the previous owner of our house had left behind. (thanks Andre!)
Here are some photos of the process:

First I gathered the items needed. Soapy water, bubble wrap, roving, resist, and tulle. Laying out first layer of roving around the edge of the resist so there is fringe, then a layer horizontally. Cover with tulle, wet and gently rub in a circular motion. Turn over.
You repeat the above process, 2x per side in your inside color, and 2x per side in your outside color. Switching from laying horizontally to vertically. So each side has 4 layers. On the last layer I added a little design.

Next step is the rolling. In between 2 layers of bubble wrap, roll up with foam roller. Roll 30x, then rotate 1/4 turn. When one side is complete, turn over and repeat.

Carefully cut out a hole, removing the resist. Repeat the rolling process. Then you can start to shape it. Using soapy hands and anything with a round smooth side (ice cream scoop in my case) rub it all over, getting the crease out and making  it stand up.
Then set it on a rack to dry. TSK had to check it out, of course.

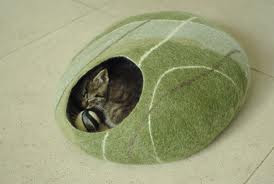
The finished product. I see I chose poorly in my colors (looks rather gourd like) but as a test it's fine. For the felted cat cave I would use heavier layers of roving to make it sturdier, and also larger with the hole on the side.
This is an image of what a felted cat cave looks like. Cute huh!
So all in all I think the test was a success. Like so much of wet felting it's a very physical process. And an arm and shoulder workout! I'm sure that's just a bonus.

What do you think? Would TSK like something like that? Would your kitty?

Saturday, March 16, 2013

Oy Felt!


Nuno Felting

Nuno felting is a fabric felting technique developed by Polly Stirling, a fiber artist from New South Wales, Australia, around 1992. The name is derived from the Japanese word "nuno" meaning cloth. The technique bonds loose fibre, usually wool, into a sheer fabric such as silk gauze, creating a lightweight felt. The fibres can completely cover the background fabric, or they may be used as a decorative design that allows the backing fabric to show. Nuno felting often incorporates several layers of loose fibres combined to build up colour, texture, and/or design elements in the finished fabric. Via Wikipedia

After playing around a bit with wet felting (see the previous post). I thought I'd like to try some Nuno Felting. And it just so happens that my sister has a birthday coming up! I thought she might like a scarf.

I found a couple good websites that had videos to watch with good info and instructions and took copious notes.

Gathered my materials and jumped in. Here are some photos of the process:

Because I will be felting both sides, I needed to mark how big the piece of silk chiffon was. Glad the kitchen countertop was long enough!

Next, made sure my bubblewrap and tule were big enough (they were) then laid down the plastic wrap on top of the bubble wrap so the fibers didn't get down in between the bubbles.


My roving and wool yarn at the ready, putting down the bottom layer.
Bottom layer done, silk scarf on top, starting top layer.

Finished with that step, tulle carefully placed on top. Now time to wet with soapy water.
After entire piece is wet, time to start rolling. Whole thing rolled up and tied. Roll 200 times, unroll, takeoff and put back the tulle, roll up and roll for another 200, and again and again until the fibers start coming thru the silk.
 I got so involved in the process that I failed to take pix of the next step. Unroll piece, gently add some HOT soapy water and rub. The take to the sink, rinse in hot water and hold in hands and let fall into the sink. Rinse, repeat. again and again. Then switch to cold water for the final rinse.
Lay out on a towel to dry. This is both sides.

Here you can see how much is has shrunk and puckered.

And the final result. I hope my sister likes it!
 And there you go! I have another piece of silk... who should I make the next scarf for?


Tuesday, March 5, 2013

Felting!


I have been needle felting for a bit now(you can see some of my work here)..and thought I would try wet felting. It's a much different process then needle felting.

The way wet felting works is you layer drafts of roving(about 4-8 layers) on to bubble wrap.
cover your piece with tulle fabric and wet it carefully with hot soapy water.
Rubbing gently as the piece gets wet and soapy, then more vigorously.
Every few minutes carefully remove the tulle and replace also making sure you turn the piece over to get both sides. That is the 'felting' process. Then begins the 'fulling' process.
You roll the wet piece up in the bubble wrap, tulle, and bamboo mat.
and roll it, and roll it, and roll it, opening it up every few minutes to change direction and check it.
Finally you rinse in hot water, then cold. Squeezing out the water, blotting on a towel and rolling it flat with a rolling pin.

Here are some photos I took during the process.

base layer of white and the design on top

work area ready to go

Hot soapy water at the ready

piece covered in tulle, rubbing has commenced

fulling the piece

before rinsing, but finished

drying

the finished piece

I lightly stitched to a store-bought piece of felt and hung.
What do you think? Not too bad for my first effort. It's just a small piece, maybe next time I will go a little bigger.
Love to hear your comments!